In collaboration with Dr. Kate Hardy and the Department of Psychiatry at Stanford Medicine, our team produced a total of 17 clinical vignettes that provide cognitive behavioral therapy (CBT) in-training for nursing staff when treating patients with symptoms of psychosis.
CBT is a psycho-social intervention that focuses on changing adverse cognitive distortions and behaviors, improving emotional regulation, and developing personalized coping strategies. Its application to treatment of psychosis is efficacious, yet novel enough that many clinical practitioners have not been trained in CBT therapy to effectively practice it with their patients. Our series of clinical vignettes aims to instruct viewers on CBT within the framework of the FIRST model, which stands for Forming a Relationship, Inquiring Curiously, Reviewing the Information, Skill Building, and Trying Out the Skill.
Development
Outlining the Series
Our first step was to comprehensively create outlines of all the ideas and learning objectives for this project. The results were meant to be rough and crude, yet written so that the learning objectives and general storylines were clear to the reader. Key moments and lines of dialogue were also inserted to highlight their importance.
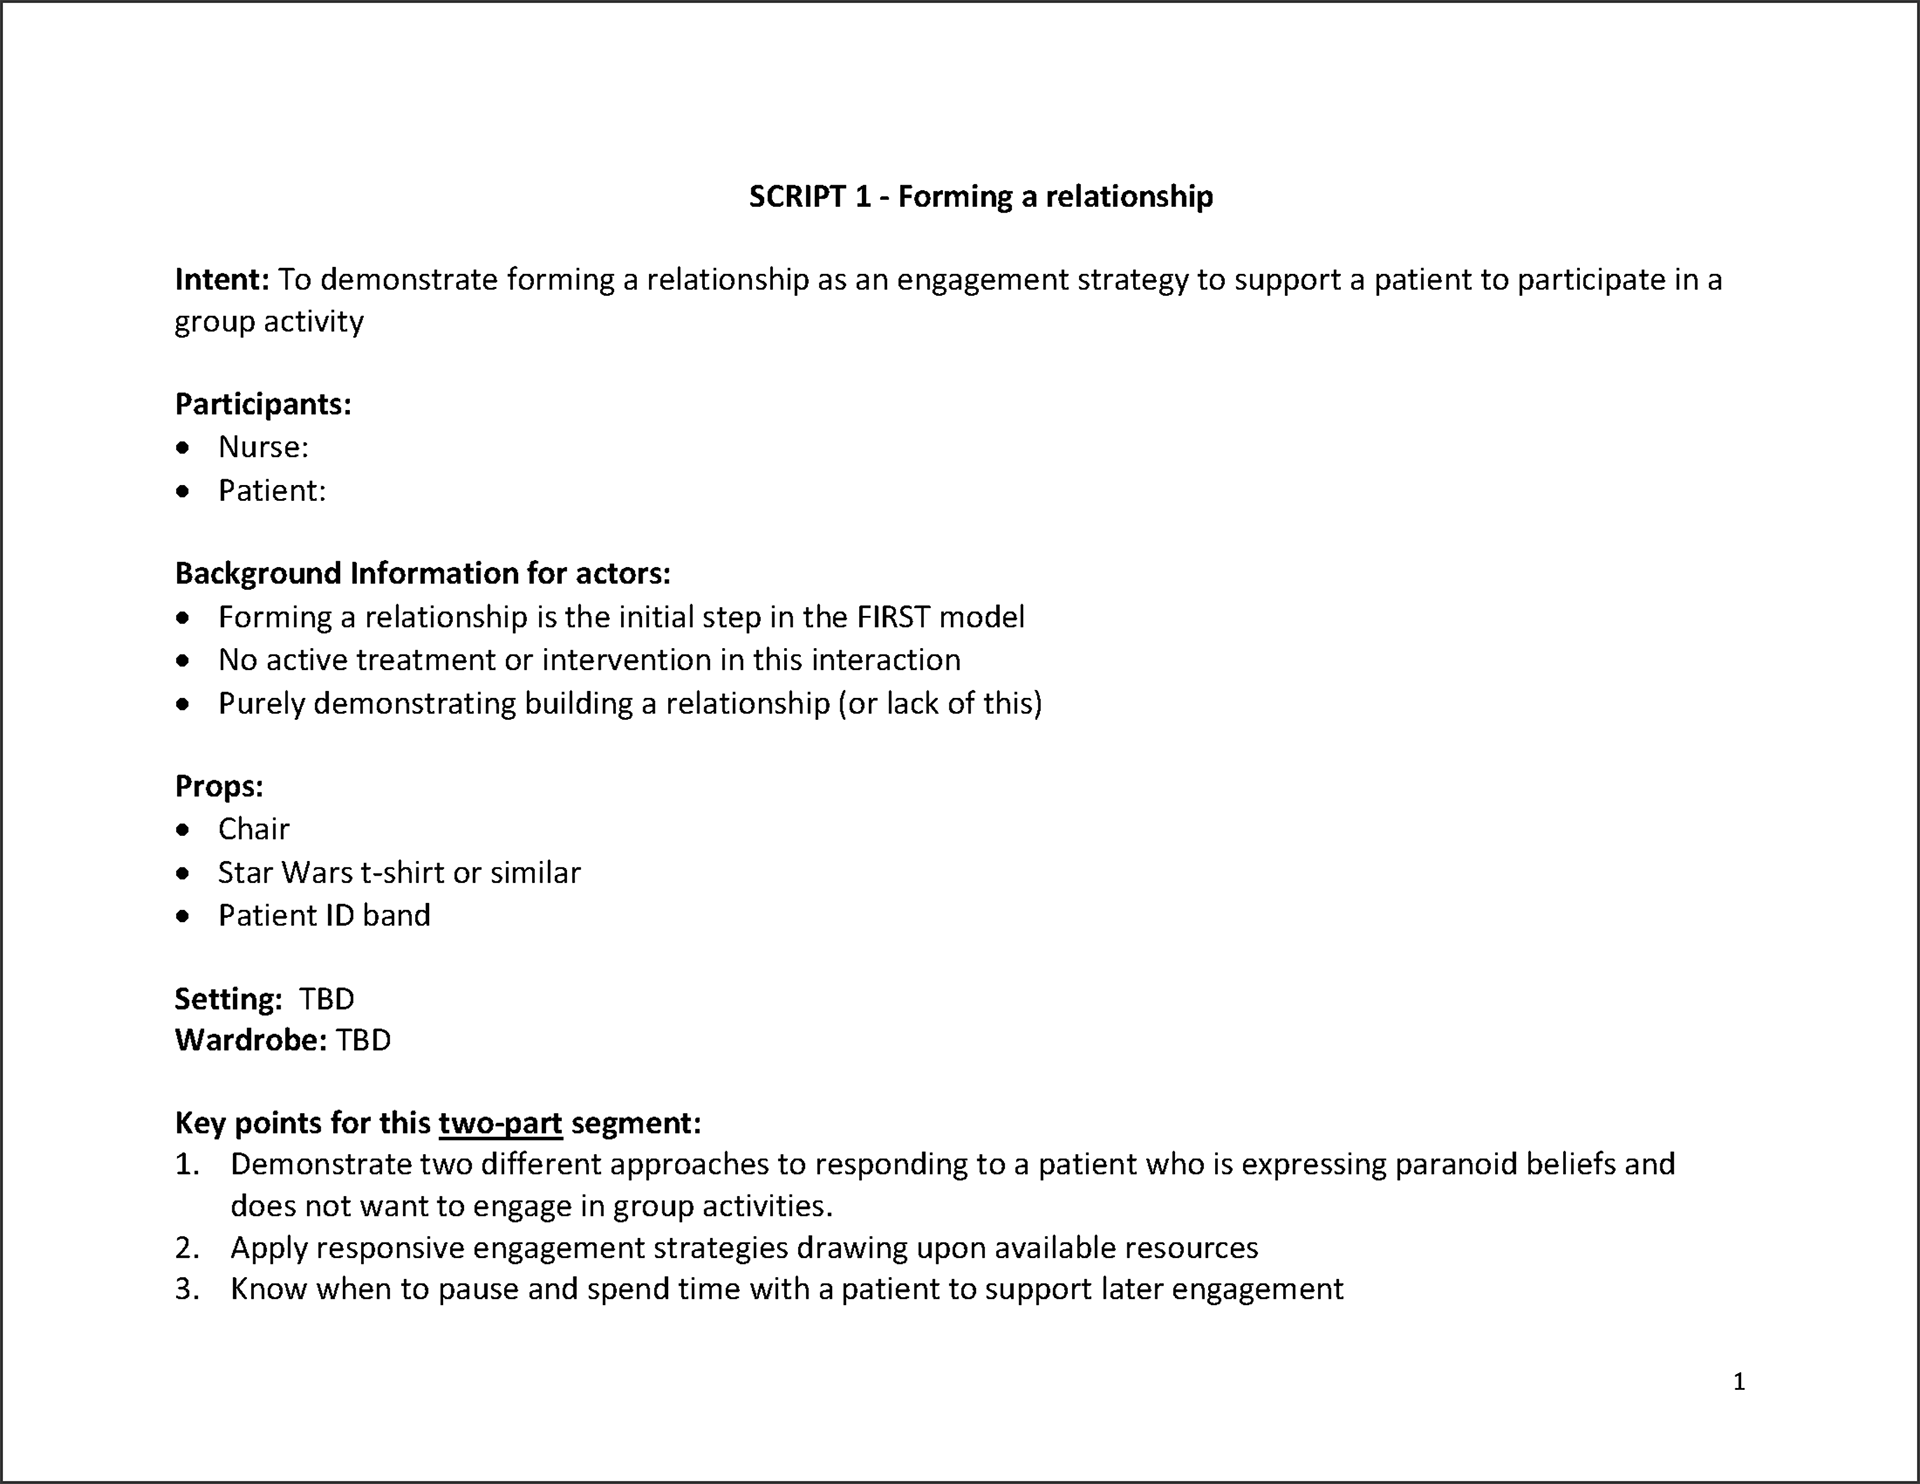
One of the key concepts for these vignettes came into focus during this development stage, which was to separate several of the scenes into two parts to highlight both the correct and incorrect ways of treating the patient. Because these vignettes are ultimately a passive learning tool where viewers absorb the content by the mere act of watching, this dichotomy serves to reinforce the learning objectives which might otherwise be lost in a single-path structure.

Writing the Scripts
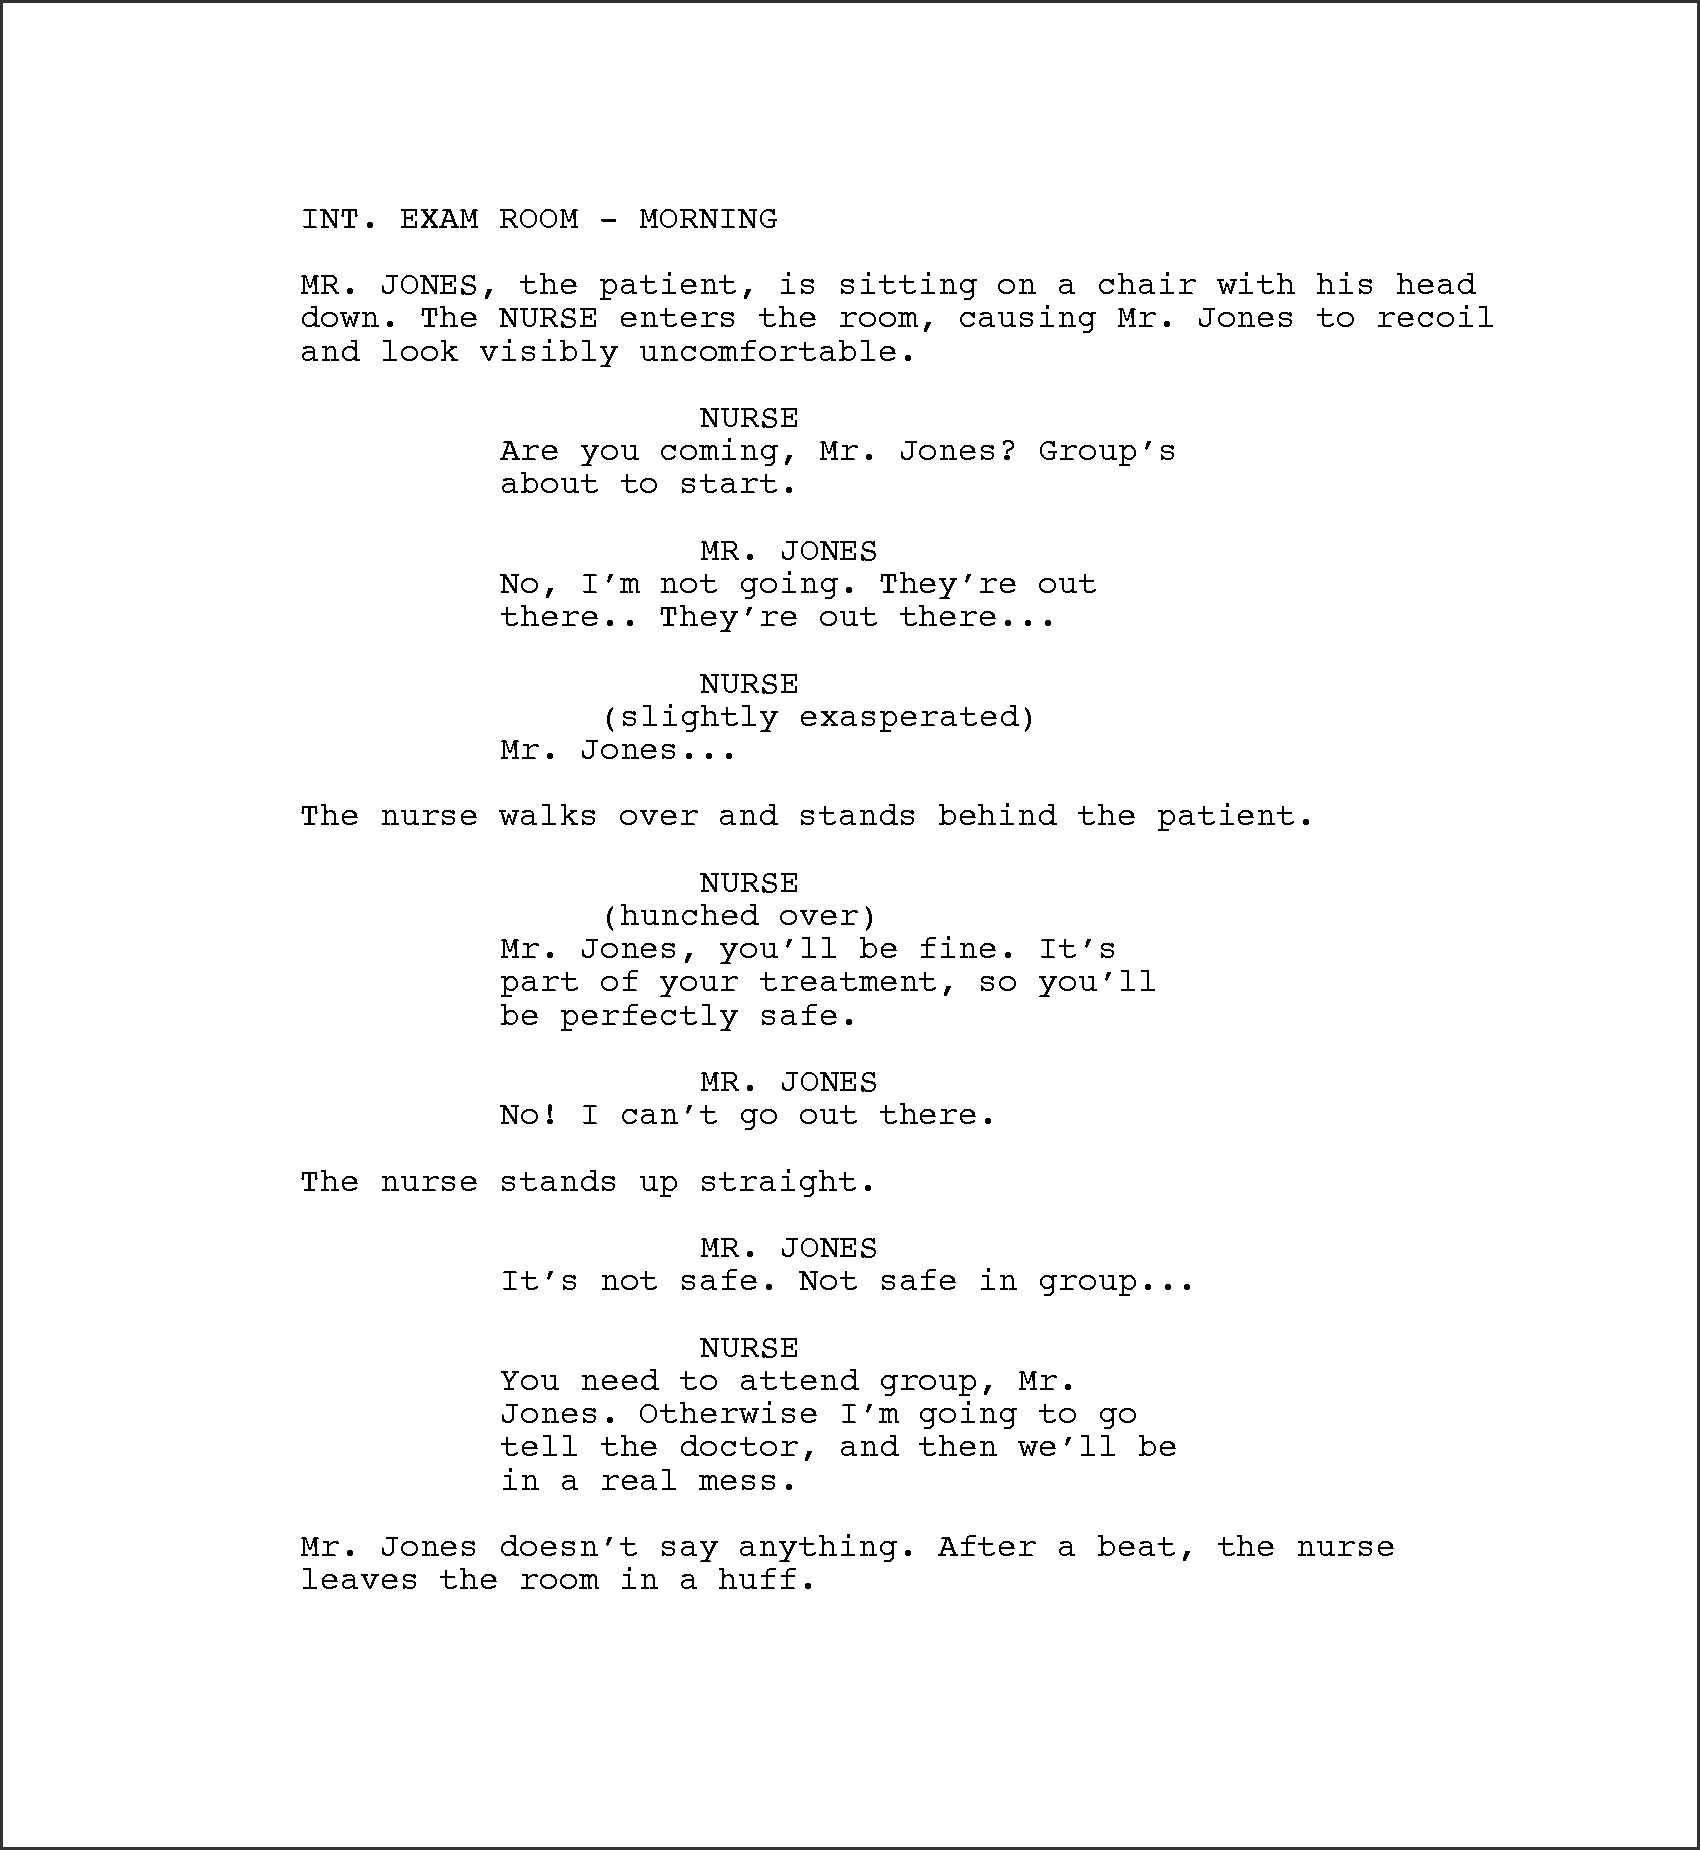
The team then converted these outlines into scripts, visualizing these stories as full-fledged short films that contain not only dialogue, but also descriptions of the scene, character behaviors, and sometimes even camera movements, all of which underwent several reviews by both subject matter experts and our internal team for accuracy and authenticity.
Given the tight schedule with which pre-production and production was to take place, the scripts were drafted with improvisation in mind. In doing so, the actors were not expected to memorize the scripts verbatim, but rather to use them and the outlines for preparation and rehearsal.
Pre-Production
Casting & Location Scouting
Our casting process involved a hybrid approach of hiring theatre-trained performers and keeping the cast internal to our production team. Patients were played by standardized patients and local actors, whom our team selected based on matching descriptions and relative acting range. Doctors, on the other hand, were played by Dr. Hardy and her colleagues at the Department of Psychiatry, which was a boon to our improvisational shooting approach. It turns out that there are no better actors to play medical professionals than actual medical professionals themselves!
Location scouting at Stanford has always been a tricky prospect for our team given the constant unavailability of rooms due to classes, meetings, and other uses. Significant factors that affect shooting locations include size, noise levels, and availability of light. After a great deal of searching, we settled on an office in the Li Ka Shing Center, which we converted to double as a patient room in a psychiatric hospital for our vignettes.
Lists, Lists, Lists
A major part of pre-production involves the creation of several lists, all of which serve to prepare the cast and crew as thoroughly as possible before actual production begins.
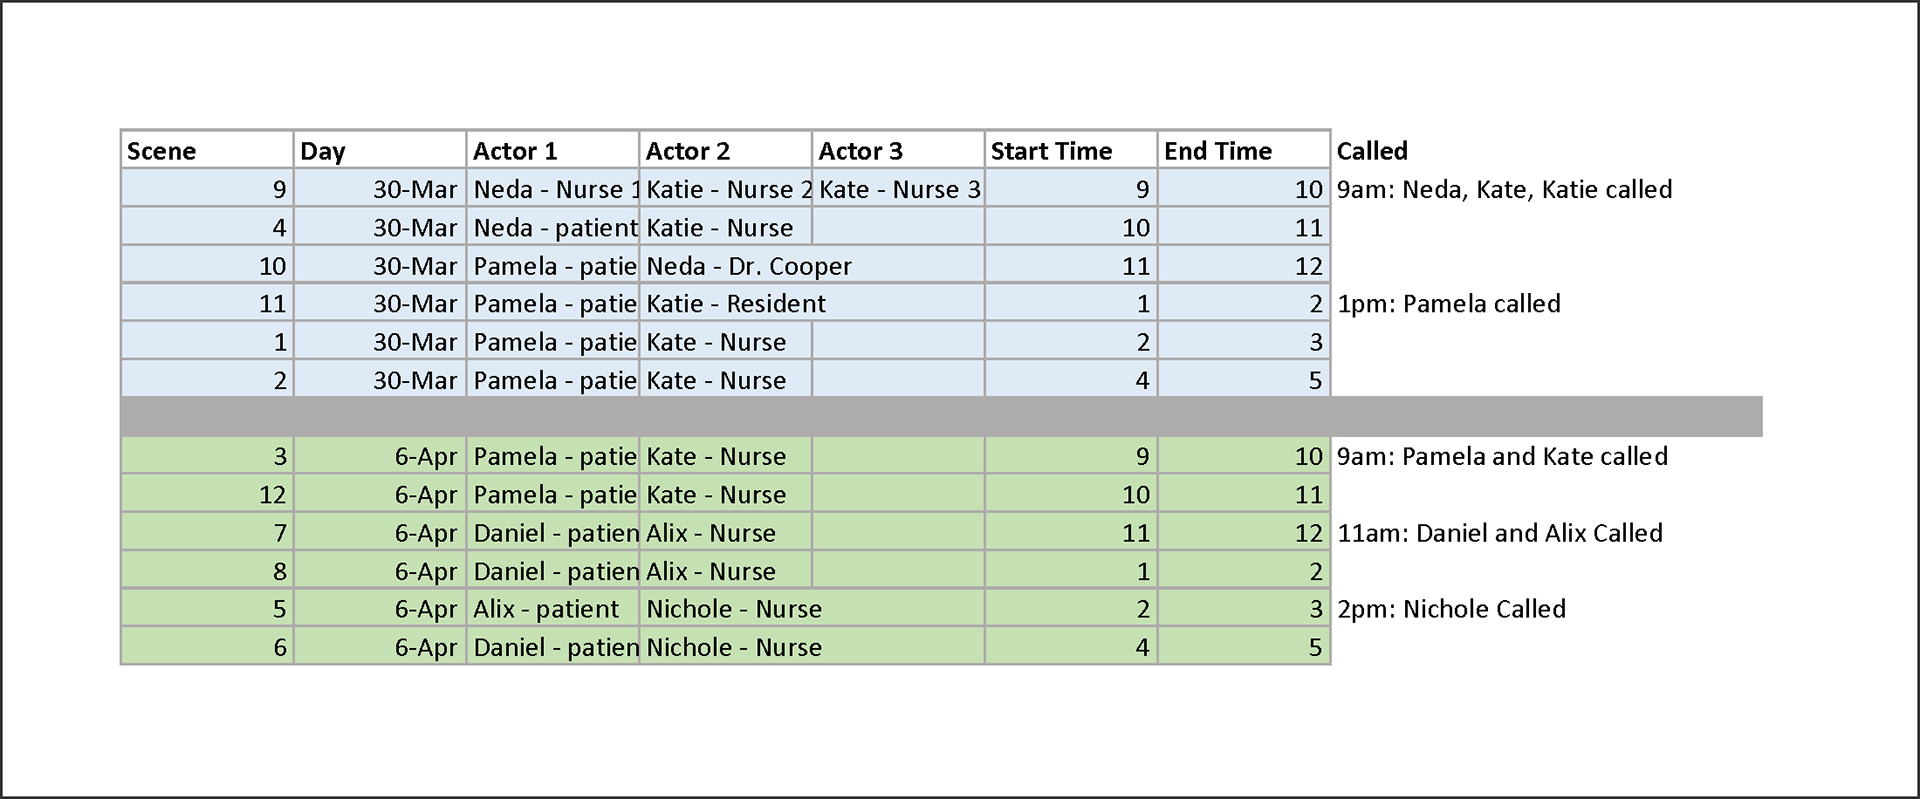
Arguably the most important is the shot list where every single planned shot, its adjunct camera setup, and the required equipment are all written out on a spreadsheet. In constructing the shot list, a strong sense of mise-en-scène is required, along with a vivid understanding of what the final product will look like. If possible, the shot list should also include estimates of how long each shot, each take of each shot, and each scene would take to film, which ultimately becomes important for scheduling shoot days and creating call sheets.
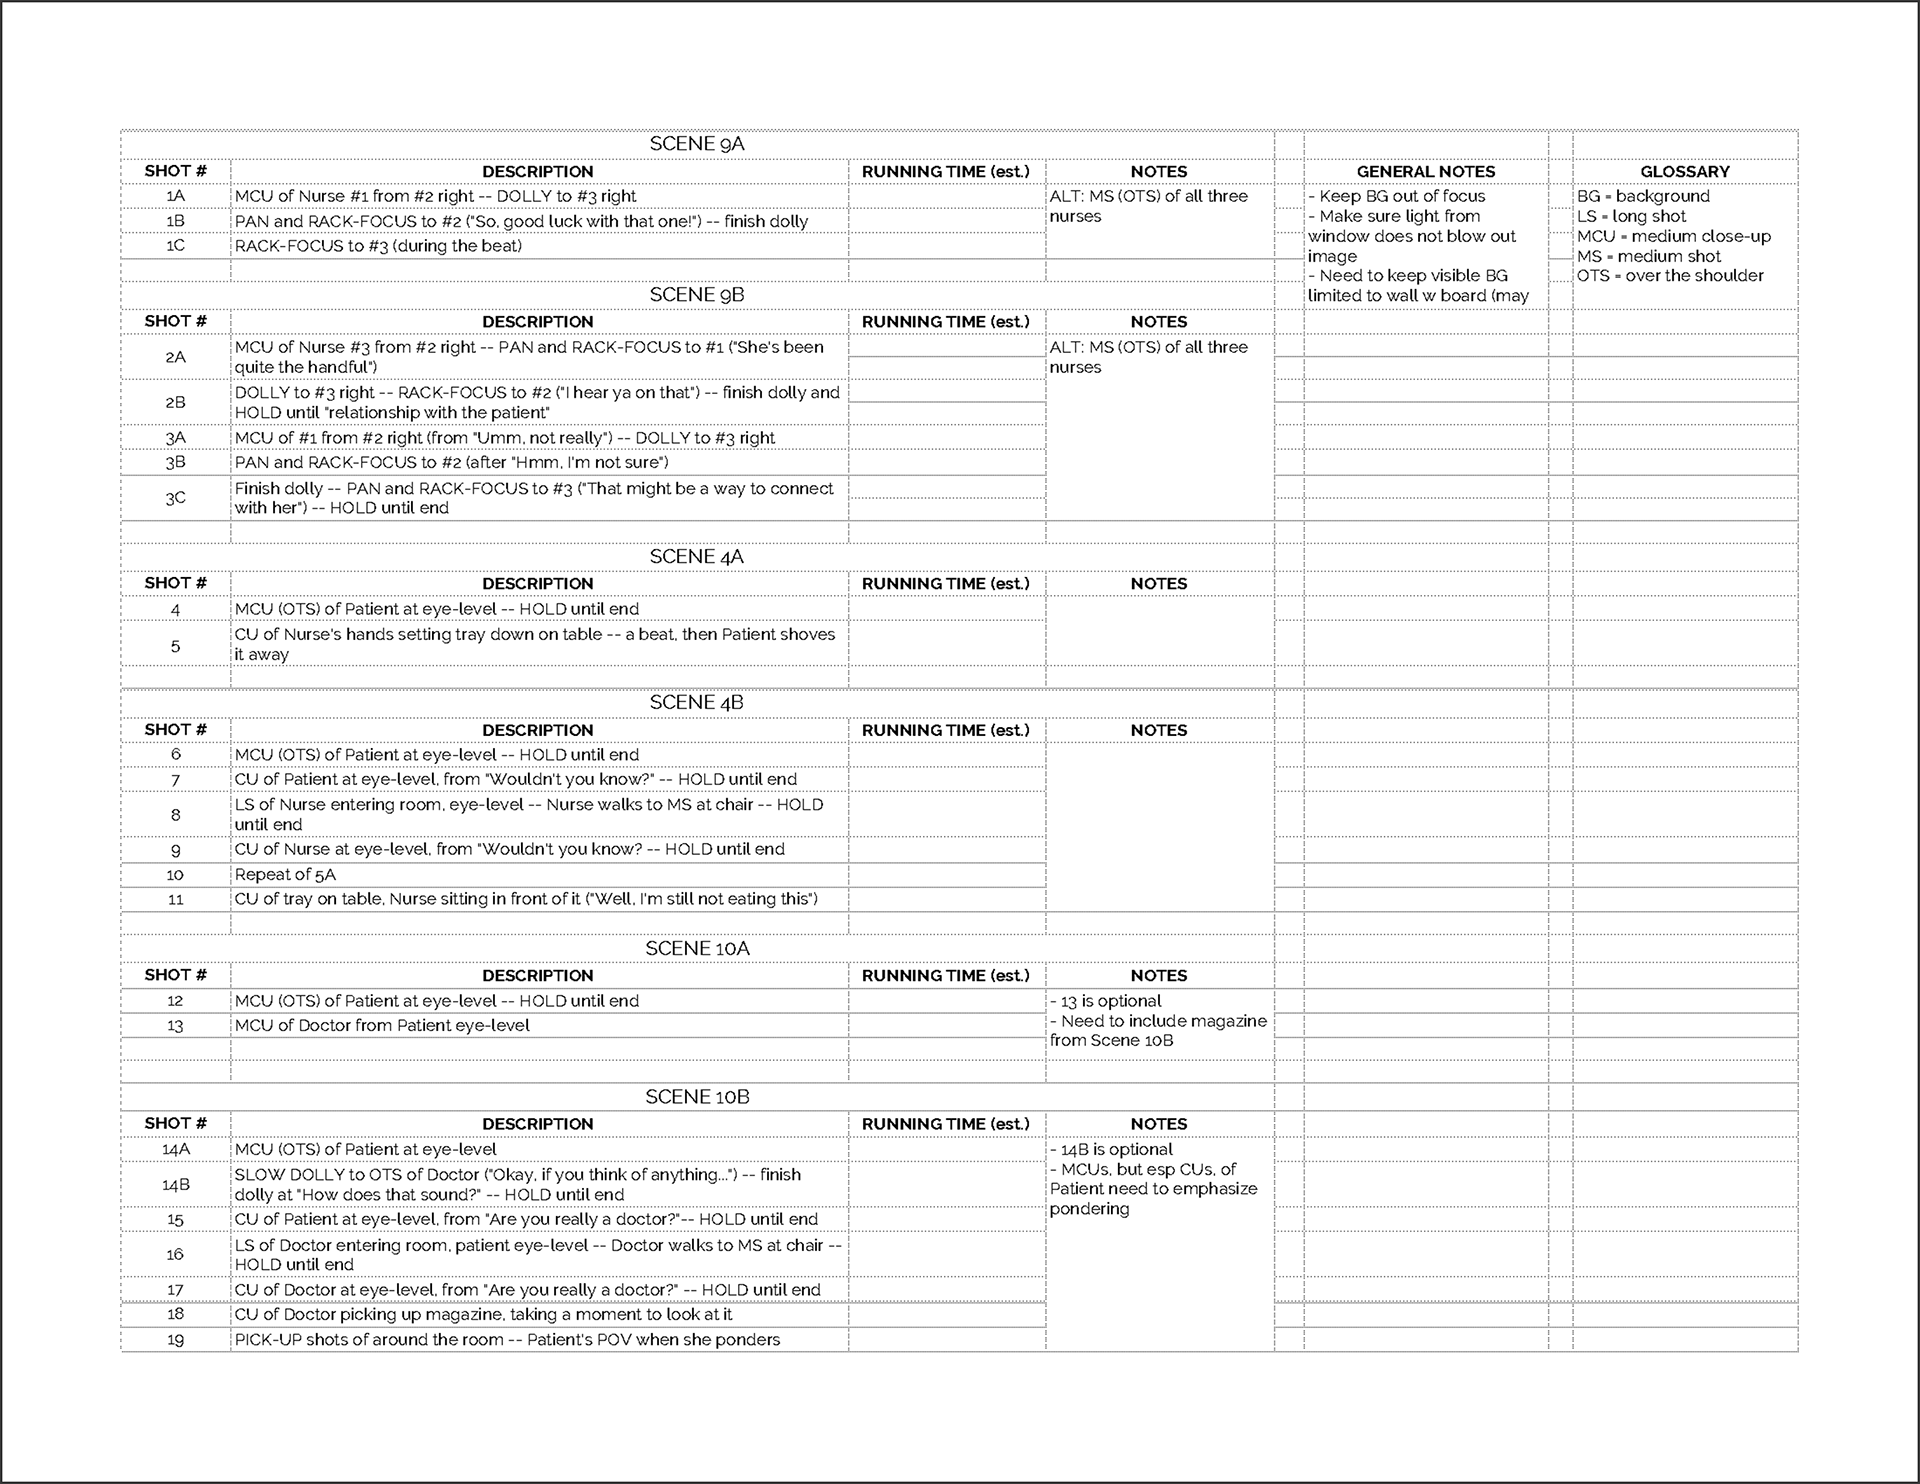
Shot list for day 1
For our production, the shot list was particularly useful in squeezing in the filming of 17 videos in two shoot days. Because of the tight schedule, our team had to find efficient means of shooting that would yield effective results, and our shot list reflected these decisions to a tee. For example, all "incorrect" scenes, especially the louder, more hectic ones, would involve creative camera movements and setups, but all "correct" scenes should eventually be streamlined into simple dialogue setups. Such organization, accurately detailed in the shot list, allowed the team to quickly and seamlessly move from one shot to the next for setup and filming.
Other crucial lists include, but are not limited to, equipment lists, prop lists, and call sheets. The first two serve to remind the cast and crew of what exactly is needed on set, while the call sheet informs the team of when everyone is needed on set.
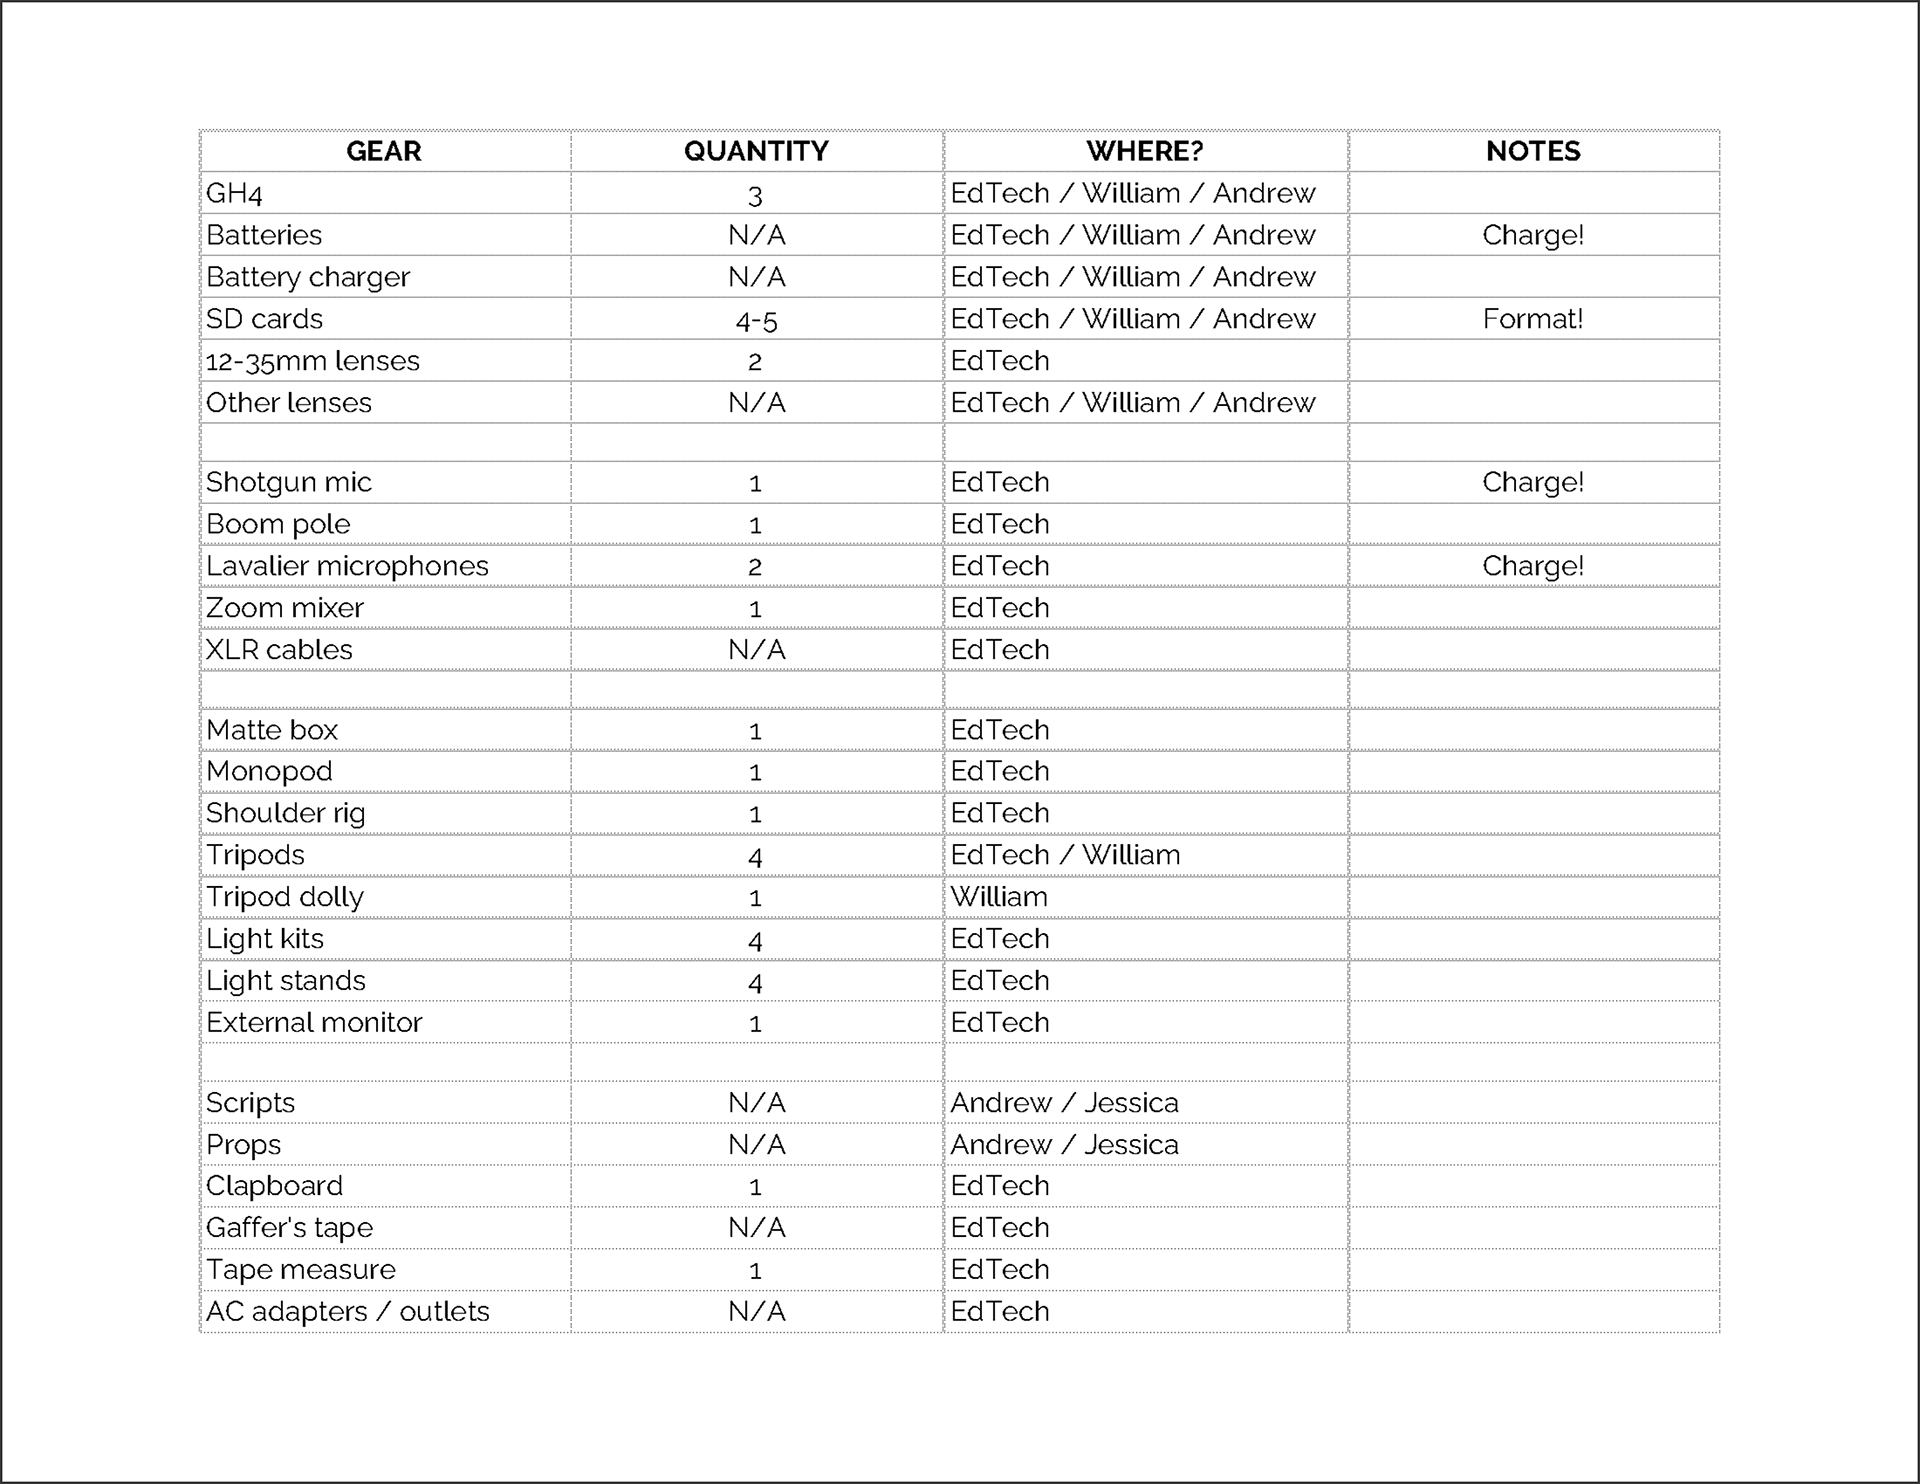
Equipment list
Call sheet
Production
Filming
The shoot occurred on two back-to-back Saturdays. The cameras used were Panasonic GH4 with Voigtlander MFT lenses, while all audio was recorded on Zoom H4n mixer using a combination of lavalier mics and a Rode boom mic.
Because much of the creative brainstorming was invested in pre-production, filming itself was a matter of capturing all the planned shots and checking them off the shot list. This preparation made it necessary to make only a few compromises, namely by simplifying the beginning and ending shots of certain scenes. At the same time, the process of filming is always hindered by the various levels of setup required for each shot — lighting, mic, camera, and camera supports. Even with meticulous preparation, there are inevitable delays in the production schedule, though in our case not significantly.
An important part of filming involves taking careful shoot notes, which is essentially a list of each take, its corresponding shot number, and specific notes about each take. These will come in handy during post-production as a kind of directory for all the captured footage, so that the editor does not have to scrub through every one of them.
Post-Production
Organizing the Footage
The first part of this step — that is, unloading footage off the memory card — can be carried out as soon as filming is over. Some productions even have a separate station on set dedicated to this task, but our team was fortunate to have our main office nearby so that we didn't require such setups.
Once the footage was dumped onto our cloud storage system, the remaining task was to organize the files into ordered folders, which all editing will reference thereafter. Though there are myriad ways to organize these files and folders, our team opted to categorize the folders first by scene number, then by camera number if applicable, followed by shot number. This is another instance in which the shoot notes become useful, for the editor can quickly determine which take or file goes with which scene.
Assembly Cut to Picture Lock
This step is where editing officially begins. Using the shoot notes that detail which take worked best for which scene, our team began by creating first drafts, otherwise known as assembly cuts, of all 17 videos. These drafts, like the outlines that eventually became scripts, are meant to be rough and crude, although an editor may opt to focus on timing, stabilization, and other tasks that are often set aside for future cuts.
Each new draft should invite a round of feedback from both the team and its clients, which led us to utilize Frame.io, a cloud-based video review and collaboration software. This tool allowed our faculty collaborators and subject-matter experts to easily leave time-specific comments, while Frame.io's version control kept each draft organized and subsumed into the previous.
An ideal post-production workflow emphasizes the importance of picture lock, which is when all video edits prior to color correction and graphics are completed. Any edits done after picture lock create a ripple effect that spreads to the rest of the workflow, often leading to large amounts of extra time and frustration. For our project, we were fortunate to achieve picture lock before entering any subsequent phase in post-production.
All editing was done on Adobe Premiere Pro.
Audio Editing & Mixing
Aside from syncing up the audio with its matching video, all post-production work for audio was conducted on Adobe Audition.
The first step was to isolate each line of dialogue so that no extra tracks were overlapping. It is also good practice to keep each character's audio on its own track so that separate rounds of mixing can be done for each. Some editors take the opportunity here to add in room tone throughout the entire video or scene in order to establish a baseline threshold for noise before any mixing is done.
Once the dialogue was more or less fixed in timing and length, the team began to record and insert sound effects, otherwise known as foley, that were part of the scene — whether the setting down of a cup or the opening of a door — but not recorded in production with the highest fidelity. (It should be noted that all foley was kept on a track separate from the dialogue tracks for mixing purposes.) This is an often overlooked step in the workflows of many filmmakers and videographers, but spending time on foley adds definition and dimension to the scene that would have been missed by merely mixing and balancing the sounds recorded on set, which is typically a losing proposition.
Once the dialogue and foley were stitched into place, the team proceeded into the mixing process by using a wide variety of effects such as compression, noise reduction, and speech levelers. It is a meticulous, lengthy process that can sometimes require hours of listening intently and exclusively to a short clip. Where audio editing is the task of stitching together all the dialogue and sounds for the scene, audio mixing is the stage where those very sounds should become clear, clean, and crisp.
Color Correction
This step can also be carried out once picture lock is achieved. In essence, color correction is to video what audio mixing is to audio, where the goal is create a similarly balanced yet striking palette, in this case for the scene's visuals. Adjusting properties such as color contrast, exposure, and white balance allows the video to "pop" and establishes an overall visual tone. Just as with audio mixing, an editor can spend hours during this process, whether tweaking the settings for a specific shot or matching one shot with another.
Although Adobe After Effects possesses an expanded range of color correction tools, our team continued to use Adobe Premiere Pro, which holds its own sufficient set, primarily for workflow simplicity.
Final Cut & Delivery
Once these edits were complete and approved by all shareholders, the team began the exporting process using Adobe Media Encoder, where we rendered each of the 17 videos to high-definition quality. Because these exports can take hours, even a whole day, to complete, our team took advantage of our rendering farm, which is a separate computer, accessible remotely and loaded with upgraded specs, solely for the purpose of exporting large files, rather than relying on our personal workstations for this task.
As mentioned in the introduction, these videos were to be used for private training of doctors, nurses, residents, and faculty, and therefore are not available to the general public. If you would like to view the videos, please reach out to the EdTech team for private sharing and viewing.